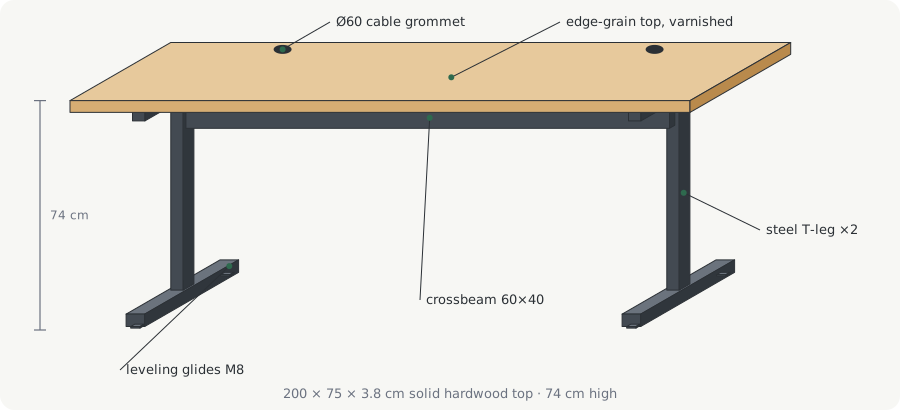
The hardware page puts a Mac Studio and a Studio Display on the desk. This page builds that desk: a large solid-wood top in the Uplift style on a black steel frame welded at one fixed height. There is no crank, motor or anything else that moves, so there is nothing to wear out.
Status: plan, not built yet. Prices are estimates (about 1,450 RWF to the dollar), because no Kigali shop publishes a price list. Call before you go. The supplier listings online are years old.
How it goes together
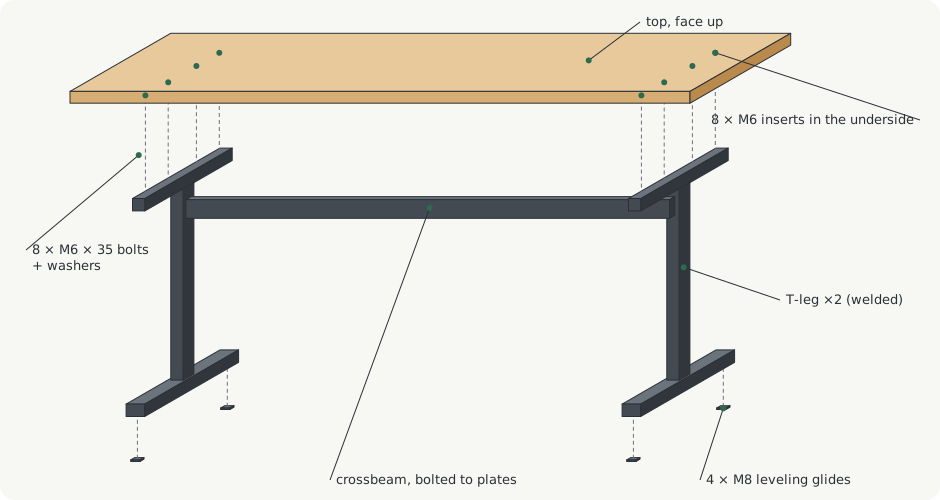
There are three parts, made by three people, and they meet only at the end:
- The top. You glue 12 hardwood strips into two panels, join the panels, then flatten and varnish the result.
- The frame. A welder at Gakinjiro builds it from the drawings on this page.
- Assembly. Eight M6 bolts screw into threaded inserts in the underside of the top. Leveling glides go under the feet.
The frame bolts to the top and the crossbeam bolts to the legs, so the desk comes apart into four flat pieces for moving.
Choose the height
Do this before the welder cuts anything. The leg column is the only part that changes.
The column length is the desk height minus the top (3.8), the arm (4), the foot (4) and the glide (0.5).
Where to buy
Bill of materials
Each "photos" link opens an image search for that exact part. Show the photo in the shop.
A · Timber and yard service, 124k–190k
B · Steel frame and fabricator, 109k–181k
The fabricator usually supplies the steel. Hand them the frame drawings and get one price for steel plus labour.
C · Hardware and fasteners, 30k–49k
D · Glue, sanding and finish, 41k–68k
E · Safety, 15k–25k
Tools to buy
You keep these. The range is wide because of the brand: Makita at Sofaru (warranty + service) at the high end, a budget brand at the quincailleries at the low end. Borrowing the six long clamps saves about 100k.
Don't buy: a planer (the yard does it), a welder or grinder (the fabricator does that work), a circular saw (have the yard cut the joined top to size), or a router (round the edges with the sander).
Build
Timeline
1 · Strips and panels
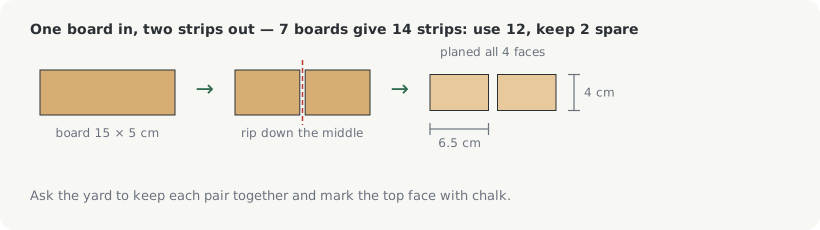
- At the yard, have each of the 7 boards ripped in half and planed on all four faces to 6.5 × 4 cm. That gives 14 strips: 12 for the top and 2 spare. Reject any strip that is twisted or cracked.
- At home, stack the strips flat with pine spacers between the layers, indoors and off the floor, for 2–3 weeks. Wood from Kigali yards is often still wet, and wet wood glued now will crack or cup later.
- Lay out 6 strips per panel. Flip every other strip so the end-grain arcs alternate up and down, which keeps the panel from cupping. Number the strips with chalk.
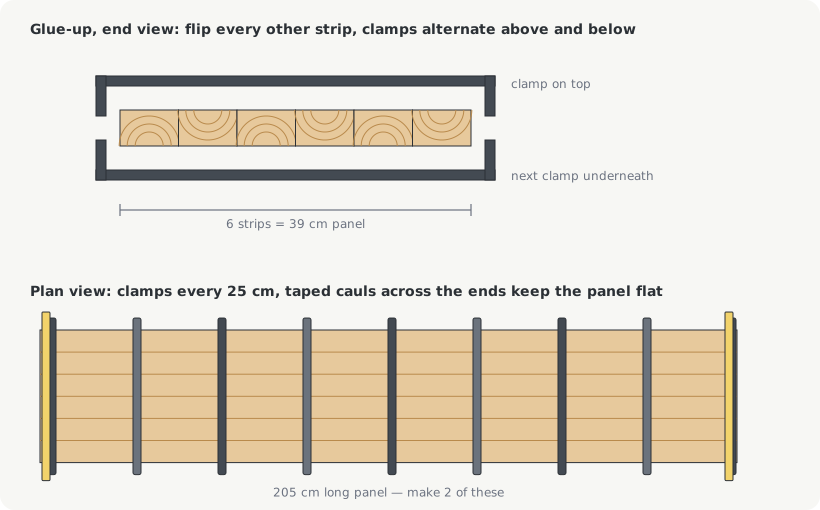
- Dry-fit first, with no glue. Clamps go every 25 cm, alternating above and below the panel. Put a taped pine caul across each end to keep the panel flat. When the dry fit closes with no gaps, take it apart.
- Glue: run a thin bead along each joint, spread it, then clamp just until a line of small beads squeezes out. Too tight starves the joint. Check the panel is flat with the straightedge.
- After ~1 hour, scrape off the half-dry squeeze-out with the glue scraper. Leave the panel clamped overnight. Make the second panel the same way.
2 · Join, flatten, cut
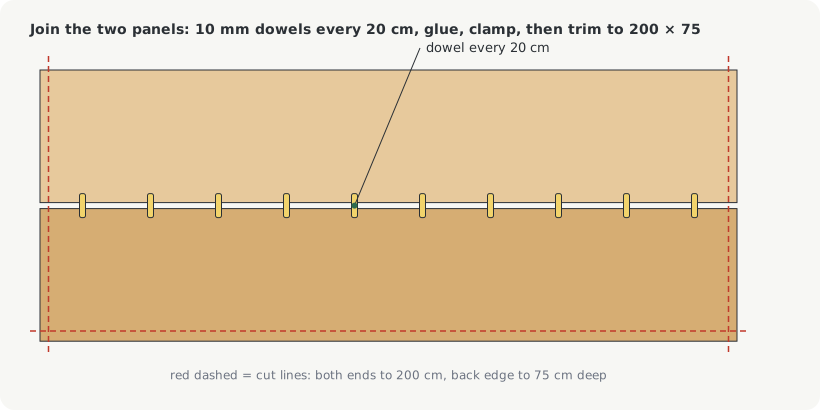
- Scrape and sand both panels flat with 80 grit. Check across and along with the straightedge. Low spots show as light under it.
- Line up the two panels and mark a dowel every 20 cm along the joint (10 dowels). Drill 20 mm deep into each edge with the 10 mm bit in the dowel jig, so the holes line up exactly.
- Glue the edges and dowels, clamp, and check flatness across the joint. Leave it overnight.
- Take the top back to the yard and have it cut to 200 cm long and 75 cm deep. The joined panels come out about 205 × 78. This cut needs a long, straight saw, which is why you don't do it at home.
- Round all edges slightly with the sander and 80 grit, then soften them with 120.
3 · The frame (welder)
Give the fabricator these two drawings. They contain everything needed: tube sizes, lengths and hole positions.
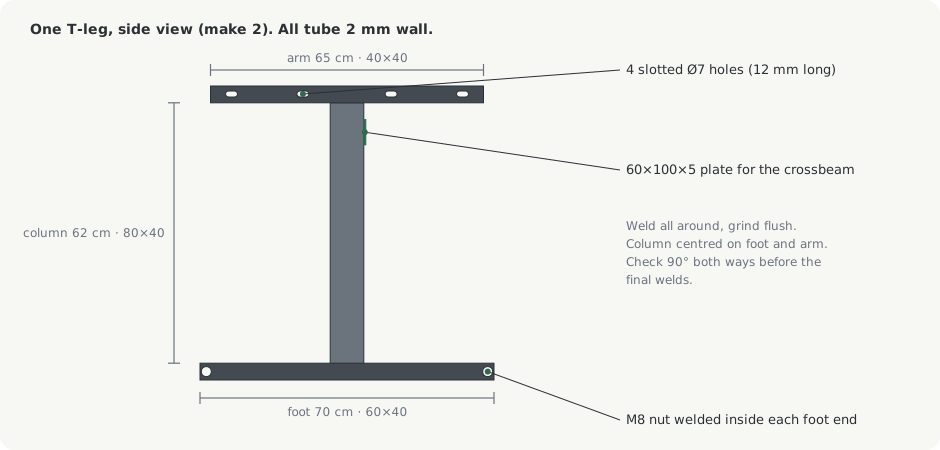
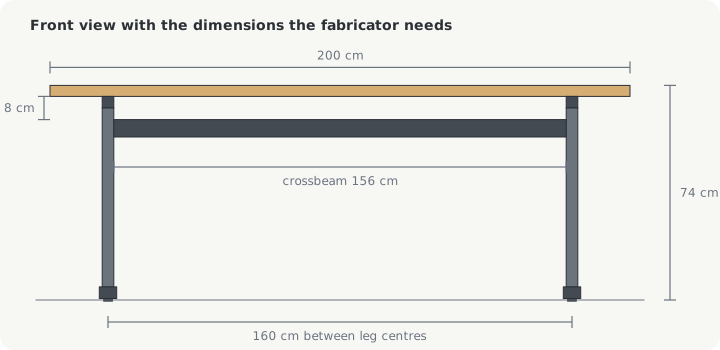
What to tell the welder:
- Make two T-legs: a 60×40 foot 70 cm long, an 80×40 column 62 cm tall and a 40×40 arm 65 cm long. The column is centred on both the foot and the arm. Every joint is 90°, checked both ways before the final weld.
- Weld an M8 nut inside each end of both feet, to take the leveling glides.
- Drill 4 slotted Ø7 mm holes through each arm (12 mm long slots, along the arm) at 10, 27, 48 and 65 cm from the front. The slots let the wood move with the seasons.
- Weld a 100 × 60 × 5 plate on the inner face of each column, 8 cm below the top of the arm. Bolt the 156 cm 60×40 crossbeam to the plates with M8 bolts. Don't weld it, so the desk can come apart.
- Grind all welds smooth, fit the end caps, then prime and paint matte black (or powder coat).
Check before you pay: the legs stand without rocking on a flat floor, the arms are level, and the two legs are identical.
4 · Finish the top
- Sand the whole top 120 → 180 → 240, wiping off the dust between grits.
- Turn it over and drill the two 60 mm grommet holes: 40 cm in from each end and 9 cm from the back edge. Drill from the top face until the bit's point shows, then finish from the underside so the face doesn't splinter.
- Fill any small defects with filler, let it dry and sand flush.
- Varnish both faces and all edges. If only one face is sealed, the top cups.
- Coat 1: varnish thinned ~10 % with white spirit. Let it dry, then sand lightly with 240.
- Coats 2 and 3: full strength, with a light 240 sand between them.
- Let it cure 3 days before it takes weight.
5 · Assemble
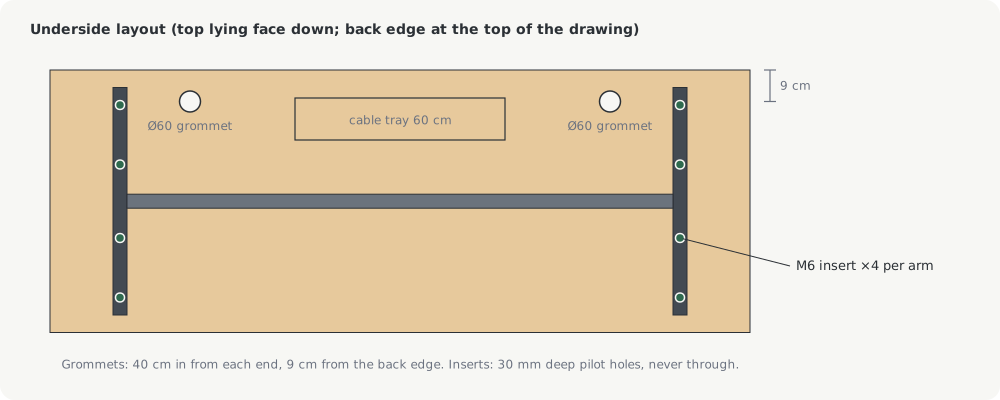
- Lay the top face down on a blanket. Bolt the crossbeam to the legs and stand the frame upside down on the top. Centre it: the legs are 20 cm in from each end, and the arms start 5 cm from the front edge.
- Mark the 8 slot centres with the pencil. Lift the frame off.
- Drill each pilot hole 30 mm deep, with tape on the bit as a depth stop so it never comes through. Drive in the M6 inserts with the hex key, keeping them straight.
- Put the frame back and bolt it on with the M6 × 35 bolts and washers. Make them snug, not crushing.
- Screw the glides into the feet, turn the desk upright (two people), and level it with the straightedge across the top in both directions.
- Fit the grommets, screw the cable tray under the back between the legs, and route the cables.
Check before you call it done
- No rocking on the floor, and the top is level both ways
- Lean 50 kg on a front corner: no sway or creak
- No glue spots on the face (they show as dull patches under varnish)
- Every bolt is snug, and no insert has pulled out
- The varnish has cured for 3 days before the monitor and Mac go on
References
- Uplift-style solid top build (Jeremiah Peoples): the look
- Two-panel glue-up (Half Moon Woodworks): the method in steps 1–2
- Wyrmwood desk: finish and edge detail
- Planning thread: the Slack self-DM, 15–16 Oct 2026 (originally a crank-adjustable design, simplified here to a fixed height)
- Supplier checks, 16 Oct 2026: Sofaru · Quincaillerie Beta · Bricotech · Gakinjiro, Kigali's furniture hub